Star of Wonder
- Elle

- Dec 15, 2019
- 4 min read
Updated: Aug 23, 2021
A memory:
It’s only five in the evening, but it’s dark outside already. On any normal day I would be on my way home by now, but it’s the first night of the nativity and my class are gathered together in a circle on the carpet; a camel, three wise men, shepherds and their flock, Mary and Joseph, and a host of Angels, and I am giving them one last cry of “break a leg” before the performance begins.

In the hall parents are assembling, their cameras poised, their mouths full of mince pies, the faint murmur of chatter permeates the hall. The stage is illuminated only by the dull theatre lights that hang waiting all year round, but are only used for this special occasion, on one night in December. A simple backdrop of black; a night sky peppered in white paper stars; and above them all, biggest and brightest, a huge silver star: the Star of Bethlehem.
Each and every year the art teacher spends her lunch hours creating the delicate night sky that floats above our Nativity scene from scratch, but the Star of Bethlehem is always saved when the scenery comes down at the end of term. For the other eleven months of the year, our Star is hung suspended from a long-redundant hook in the classroom, and is greatly admired by my class of six and seven years old for its constructive complexity and magical appearance. Yet they were even more awestruck when they saw it for the first time among its brothers and sisters in the make-believe sky in the assembly hall.
I’m no longer a teacher. I miss the magic of the annual Nativity, but I still remember it each year when I pull out my own homemade Nativity sky, stored away, wrapped in newspaper and packed away in boxes in the attic as carefully as the glass candlesticks and fragile baubles. The sight of them hanging from doors and ceilings in our house conjure up the magical moment of seeing my class – eyes wide and mouths open – as that strange origami shape hanging on that odd hook is transformed into the Star of Bethlehem, if only for one week.
Nowadays, I like to share the magic of these ever-so-simple homemade paper stars by making them for relatives; even if it is only me who is truly warmed by the memory they conjure and the seasonal magical significance they hold. I hope that by sharing this simple craft with you, that you too can make your own magical memories with your own simple, but beautiful stars of wonder.

Making your Nativity Stars
Whatever your preferred colour palette – crisp snow white, bold patterned with geometric shapes, or glittered and sparkling – all touches of individuality are welcome. Why not give another life to those last odd-sized scraps of Christmas wrapping paper, rather than consigning them to the bin?
I use origami paper (15cm-squared) for my larger stars, and I quarter the sheets to make the smaller ones. Of course, you can cut whatever paper you want into squares. This year, I opted for a mix of blocked colour and faintly festive origami paper.
Equipment:

6 sheets of square paper per star (15cm-squared origami paper works perfectly for large stars, ¼ this (3.75cm-squared) for smaller squares)
a pair of scissors
sticky tape
a stapler
a needle and some thread (if hanging)
Instructions
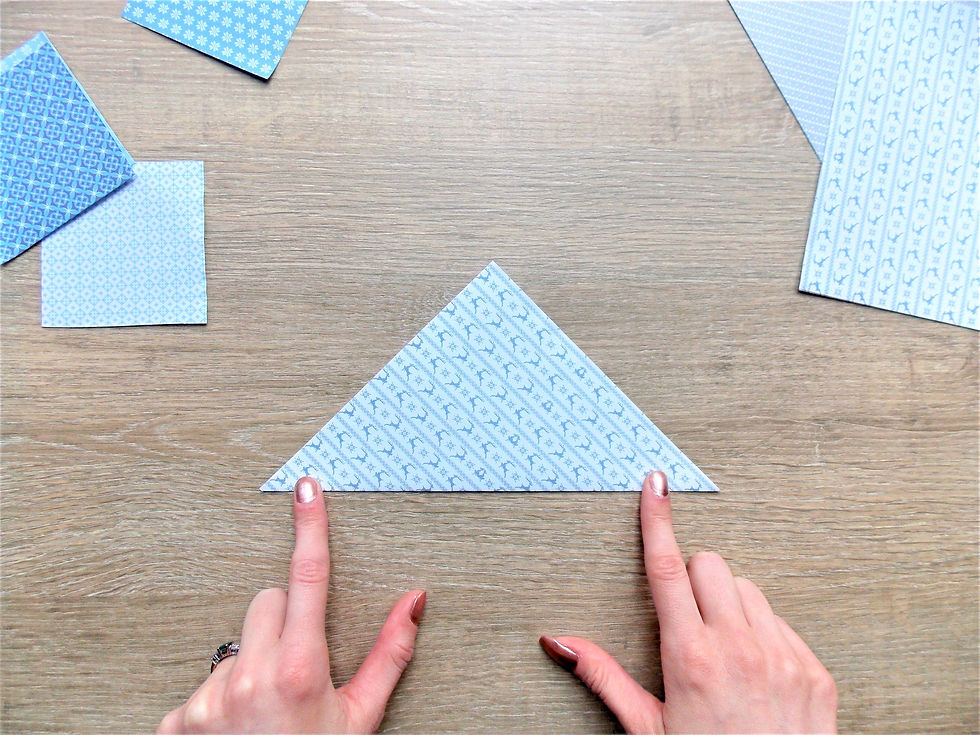
Start with the decorative side of your paper facing down, and fold your square of paper diagonally, point to point, to form a triangle.
Fold in half again, bringing the two narrower points together, to make a smaller right-angled triangle.
Turn the triangle so you can cut straight lines into the most recent fold you made, running parallel to the longest edge. For a small square, create two cuts, for larger squares, three. Do not cut all the way to the far edge, only go about 75%-80% of the way through.

Unfold your paper, and you should find a diamond shape concertina. Repeat with the other five pieces of paper.

Decorative side down, curl the two smallest cut flaps towards you, overlap them slightly, and stick them together with a small piece of sticky tape. (If you find this tricky to do without creasing the paper, use a pencil as a mould and remove once stuck.)

Turn your paper over so the decorative side faces up, and repeat with the next smallest pair of flaps. Turn and repeat, alternating which side you curl the flaps, until they are all stuck. You have a completed star point. Repeat with your remaining five pieces of paper.

Now that you have all six points ready, arrange them in a circle around a central point, ensuring that the curled arms are facing in the right direction. To construct your star, you need to join three points at a time, taping (or stapling) them at the central point. Repeat for the other three points.

Line up the two halves of your star, and staple their bases together to form the complete star shape. (I like my stars to have a little extra strength, so I staple or stick the points together at intervals around the star.)
Using a needle and a length of coloured thread, pierce a hole in the tip of a star point and tie a knot: now your star can be hung up!

If you have a desire to be extra fancy, or if you are giving your stars as a gift, it is quite nice to layer a smaller star on top of a larger star and staple/stick them together for a more extravagant decoration.


Comments